React 톺아보기 - 05. Reconciler_4
4 years ago
모든 설명은 v16.12.0 버전 함수형 컴포넌트와 브라우저 환경을 기준으로 합니다. 버전에 따라 코드는 변경될 수 있으며 클래스 컴포넌트는 설명에서 제외됨을 알려 드립니다.

현재 분석을 1 ~ 5 업데이트된 컴포넌트를 호출하여 반환받은 element를 fiber로 확장까지 진행하였습니다. 그리고 이 fiber는 reconcileChildren()에서 반환되어 5 -> 3-> 2-> 1로 전달되어 다음 Work의 대상이 됩니다.
지금까지 Work를 통해 결과물을 만들어 내었으니 다음은 이 결과물을 마무리하는 방법을 확인할 차례입니다만 그 이전에 7. completeUnitOfWork()의 진입점인 2. performUnitOfWork()를 다시 한번 확인해보면서 어떤 상황일 때 Work를 마무리 하는지 확인하고 가겠습니다.
reconciler > ReactFiberWorkLoop.js
function performUnitOfWork(unitOfWork: Fiber): Fiber | null {
  const current = unitOfWork.alternate

  let next = beginWork(current, unitOfWork, renderExpirationTime)
  unitOfWork.memoizedProps = unitOfWork.pendingProps
  if (next === null) {    next = completeUnitOfWork(unitOfWork)
  }

  ReactCurrentOwner.current = null
  return next
}beginWork()가 null을 반환8 한다는 것은unitOfWork가 leaf 노드라는 뜻으로 하위 서브 트리는 존재하지 않기 때문에 unitOfWork에서 Work 진행을 끊고 마무리9 합니다.- 현재 까지만 놓고 보면 트리의 밑으로만 내려갔지 옆으로 이동하는 부분은 없습니다. 이는
completeUnitOfWork()에서 leaf 노드를 처리하고 형제 노드가 있으면 반환9 해줍니다.
지금까지의 상황을 아래의 이미지를 통해 정리를 한번 해봅시다.

- App, Todo, Input의 fiber들은 모두 bailout을 통해 기존 current를 그대로 가져와서 workInProgress로 사용합니다.
- Input 컴포넌트를 호출하여 input과 button을 담고 있는 Fragment를 반환받습니다. key가 없으므로 바로 벗겨내어 배열을 얻고 배열에 대한 재조정 작업을 시작합니다.
- 배열 원소 중 재사용 가능한 경우 current에서 props만 교체하여 workInProgress를 만들어 냅니다. 다른 원소들도 같은 처리가 적용되며 동시에 sibling으로 연결해 준 후 첫번째 자식만 반환합니다.
- 반환된 첫 번째 자식인 input을 대상으로 Work를 진행합니다.
- beginWork(input)는 null을 반환하며 이번 포스트에서 분석할 Work 마무리 단계를 거치게 됩니다.
Work 마무리란 재조정 작업으로 얻은 fiber를 Commit phase에서 사용할 수 있도록 준비하는 걸 뜻합니다. fiber를 DOM에 올리기 위한 사전 작업으로 생각할 수 있으며 fiber와 대응하는 HTML element를 생성하거나 수정, 삭제, 이벤트 핸들러 등 Work를 통해 발생한 모든 결과물을 여기서 처리합니다.
진행 순서
App에서 업데이트가 발생하여 전체 컴포넌트가 호출된다고 가정하면 호출의 순서는 전위 순회와 같습니다.
App -> Todo -> Input -> OrderList 입니다.
input과 button, ol 등 호스트 컴포넌트는 호출 대상이 아니므로 제외했습니다.Work 마무리 순서는 후위 순회와 같습니다.
input -> button -> Input … -> Todo -> App
6 - 7 completeUnitOfWork()
먼저 VDOM 순회 코드부터 보도록 하겠습니다.
reconciler > ReactFiberWorkLoop.js
function completeUnitOfWork(unitOfWork: Fiber): Fiber | null {
  workInProgress = unitOfWork
  do {
    const current = workInProgress.alternate
    const returnFiber = workInProgress.return

    if ((workInProgress.effectTag & Incomplete) === NoEffect) {
      // completeWork(current, workInProgress, renderExpirationTime);
      // if (returnFiber !== null && (returnFiber.effectTag & Incomplete) === NoEffect) {...}
    } else {
      // Work를 진행하던 중 에러가 발생한 경우.
    }

    const siblingFiber = workInProgress.sibling
    if (siblingFiber !== null) {
      // 형제가 존재한다면 Work를 진행하기 위해 반환한다.
      return siblingFiber
    }
    // 부모로 올라간다.
    workInProgress = returnFiber
  } while (workInProgress !== null)

  return null
}- leaf 노드의 Work를 마무리
9 ~ 10 하고 형제 노드15 ~ 16 를 찾습니다. - 만약 형제 노드가 없다면 이는 부모의 서브 트리가 모두 마무리 된 것으로 다음 대상은 부모
21 가 됩니다. 이때 부모 또한 leaf 노드처럼 하위 모든 노드들이 Work가 마무리된 상태이므로 현재 여기서 자식과 같이 마무리를 진행합니다. - 계속해서 while 문은 부모의 Work도 마무리하며 위 내용을 반복합니다. 그리고 최종적으로 최상단 노드인 Host root에 도달
22 하며 끝납니다.
그러면 Work의 결과물들 중에 무엇을 마무리해야 하는 것일까요? 크게 다음의 두가지가 있습니다.
- 호스트 환경과 연관된 부분
- VDOM 변경점을 담고 있는 side-effect
첫번째는 completeWork()
6 - 8 completeWork()
Work의 결과물 중 호스트와 연관된 부분이라 하면 HTML element에 해당하는 호스트 컴포넌트가 있습니다. Commit phase에서는 완성된 element를 요구므로 여기서 fiber에 반영된 정보들을 바탕으로 element를 완성해야 합니다.
호스트 컴포넌트 이외에 suspense, portal도 대상에 포함되지만 생략합니다.
reconciler > ReactFiberCompleteWork.js
function completeWork(
  current: Fiber | null,
  workInProgress: Fiber,
  renderExpirationTime: ExpirationTime
): Fiber | null {
  const newProps = workInProgress.pendingProps
  switch (workInProgress.tag) {
    case IndeterminateComponent:
    case SimpleMemoComponent:
    case FunctionComponent:
    case ClassComponent: {
      break
    }
    case HostComponent: {
      /*...*/
    }
    // suspense, portal..
  }
}
새롭게 생성된 fiber라면 element 역시 새로 만들어야 하고 그렇지 않다면 current와 workInProgress가 가지고 있는 props 사이의 차이점을 찾아내어 기존 element에 적용해야 합니다. 이 이외에도 이벤트 바인딩이 있습니다.
먼저 element 생성 코드를 보고 난 후 업데이트 진행하겠습니다.
1) HTML element 생성
reconciler > ReactFiberCompleteWork.js
function completeWork(current, workInProgress, renderExpirationTime) {
  const newProps = workInProgress.pendingProps
  switch (workInProgress.tag) {
    /*...*/
    case HostComponent: {
      var rootContainerInstance = getRootHostContainer(); // Host root를 가지고 온다.
      const type = workInProgress.type;
      if (current !== null && workInProgress.stateNode != null) {
        // 업데이트
        // updateHostComponent(...);
      } else {
        // element 생성
        let instance = createInstance(
          type,
          newProps,
          rootContainerInstance,
          workInProgress,
        );

        appendAllChildren(instance, workInProgress, false, false);
        workInProgress.stateNode = instance;

        // event binding
        if (finalizeInitialChildren(instance, type, newProps, rootContainerInstance)) {
          markUpdate(workInProgress);
        }
      }
      break;
    }
    /*...*/
  }
}
getRootHostContainer()
7 는 설명의 간략화를 위해 생략된 부분으로 스택에서 workInProgress 트리의 Host root를 가지고 온다고만 생각해주세요. 추가하는 부분은 beginWork()에 있습니다.
-
element를 생성
14 하고 fiber의stateNode22 에 저장합니다. 만약 해당 fiber가 자식을 가지고 있다면 새로 생성한 element에도 연결21 해주어야 합니다.element를 생성하고 자식을 연결해줄 때 주의할 점은 VDOM 상에서의 자식이 아닌 DOM 입장에서의 자식입니다.문제는 VDOM에는 호스트 컴포넌트를 제외하고도 많은 종류의 컴포넌트들이 존재하므로 필터링를 통해 호스트 컴포넌트를 찾아내야 합니다.
- 마지막으로
finalizeInitialChildren()을 통해 element에 이벤트 바인딩, atrribute 적용 등 생성을 마무리25 합니다. 동시에 해당 element의 auto focus 여부를 반환25 하여 Update tag를 달아26 줍니다. 만약 이 부분이 빠져있다면 해당 fiber에는 Placement tag만 존재하므로 삽입만 됩니다.
차례대로 createInstance(), appendAllChildren(), finalizeInitialChildren() + markUpdate()를 확인하며 element 생성 섹션을 끝내도록 하겠습니다.
createInstance()
호스트 환경에 의존도가 높은 코드에 대해서는 깊게 들어가지 않고 기본만 확인하고 나오도록 하겠습니다.
react-dom > client > ReactDOMHostConfig.js
function createInstance(
  type,
  props,
  rootContainerInstance, // Host root
  internalInstanceHandle // workInProgress
) {
  const domElement = createElement(
    type,
    props,
    rootContainerInstance
  )
  precacheFiberNode(internalInstanceHandle, domElement)
  updateFiberProps(domElement, props)
  return domElement
}- 브라우저 환경의
createElement()8 는 document.createElement(type)와 같습니다.
completeWork()에서 생성한 element는 fiber의 stateNode에 저장해주었습니다. 이는 리액트가 호스트에 접근할 수 있도록 해주는 부분이고 그 반대로 호스트 영역에서 리액트에 접근할 수 있도록 fiber와 props를 element에 저장하는 부분이 precacheFiberNode()와 updateFiberProps()입니다.
react-dom > client > ReactDOMComponentTree.js
const randomKey = Math.random()
  .toString(36)
  .slice(2)
const internalInstanceKey = '__reactInternalInstance$' + randomKey
const internalEventHandlersKey = '__reactEventHandlers$' + randomKey

function precacheFiberNode(hostInst, node) {
  node[internalInstanceKey] = hostInst
}

function updateFiberProps(node, props) {
  node[internalEventHandlersKey] = props
}
appendAllChildren()
fiber를 새로 생성하였다면 다음은 ‘DOM 기준’으로 자식 호스트 컴포넌트를 찾아 연결해주어야 합니다.
reconciler > ReactFiberCompleteWork.js
function appendAllChildren(parent, workInProgress) {
let node = workInProgress.child
while (node !== null) {
// 호스트 컴포넌트
if (node.tag === HostComponent || node.tag === HostText) {
appendInitialChild(parent, node.stateNode) // parent.appendChild(node.stateNode)
// 이외 컴포넌트
} else if (node.child !== null) {
node.child.return = node
// 호스트 컴포넌트를 찾기 위해 한 단계 밑으로 내려 간다.
node = node.child
continue
}
// 내려갔던 만큼 다시 위로 올라간다.
while (node.sibling === null) {
// 형제가 더이상 없고 부모가 workInProgress라면 모든 경로를 탐색하였음을 뜻함.
if (node.return === null || node.return === workInProgress) {
return
}
node = node.return
}
// 형제로 이동한다.
node.sibling.return = node.return
node = node.sibling
}
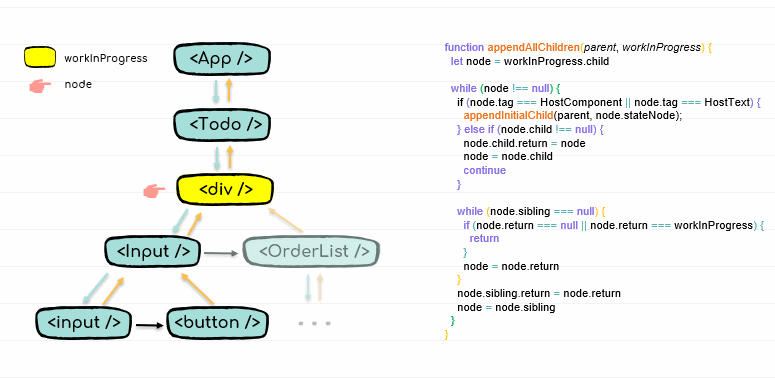
}코드 설명은 주석으로 대신하고 Todo 예제를 이용하여 appendAllChildren()의 알고리즘이 어떻게 동작하는지 확인해봅시다.
appendAllChildren() 알고리즘의 커버리지를 위해 Todo 컴포넌트의 Fragment를 div로 변경합니다.
function Todo() {
  const [todos, push] = useState([])
  return (
    <div>      <Input submit={todo => push(todos => [...todos, todo])} />
      <OrderList list={todos} />
    </div>  )
}
다음 이미지에서 Input 컴포넌트의 형제인 OrderList는 간략화를 위해 생략했음을 유의해주세요.
finalizeInitialChildren(), markUpdate()
react-dom > client > ReactDOMHostConfig.js
function finalizeInitialChildren(
  domElement: Instance,
  type: string,
  props: Props,
  rootContainerInstance: Container
): boolean {
  setInitialProperties(domElement, type, props, rootContainerInstance)
  return shouldAutoFocusHostComponent(type, props) // auto focus 여부
}
상대적으로 간단한 shouldAutoFocusHostComponent() 부터 확인 하겠습니다.
react-dom > client > ReactDOMHostConfig.js
function shouldAutoFocusHostComponent(type: string, props: Props): boolean {
  switch (type) {
    case 'button':
    case 'input':
    case 'select':
    case 'textarea':
      return !!props.autoFocus
  }
  return false
}
일전에 말씀드린대로 auto focus를 지원하는 태그들은 해당 여부를 반환해야 Update tag를 달아줄 수 있습니다.
reconciler > ReactFiberCompleteWork.js
function markUpdate(workInProgress: Fiber) {
  workInProgress.effectTag |= Update;
}setInitialProperties()는 새로 생성된 element에 이벤트 리스너를 달아주고 atrribute를 추가하는 함수입니다.
react-dom > client > ReactDOMComponent.js
function setInitialProperties(
  domElement: Element,
  tag: string,
  rawProps: Object,
  rootContainerElement: Element | Document
): void {
  let props: Object
  // 이벤트 바인딩
  switch (tag) {
    case 'img':
    case 'image':
    case 'link':
      trapBubbledEvent(TOP_ERROR, domElement)
      trapBubbledEvent(TOP_LOAD, domElement)
      props = rawProps
      break
    case 'form':
      trapBubbledEvent(TOP_RESET, domElement)
      trapBubbledEvent(TOP_SUBMIT, domElement)
      props = rawProps
      break
    case 'input':
      ReactDOMInputInitWrapperState(domElement, rawProps)
      props = ReactDOMInputGetHostProps(domElement, rawProps)
      trapBubbledEvent(TOP_INVALID, domElement)
      ensureListeningTo(rootContainerElement, 'onChange')
      break
    /*...*/
    default:
      props = rawProps
  }
  // attribute 추가
  setInitialDOMProperties(
    tag,
    domElement,
    rootContainerElement,
    props,
    isCustomComponentTag
  )
}
코드가 중복되지 않는 몇 개의 태그만 추렸습니다.
- 이벤트 바인딩과 관련된 부분은 다음 포스트인 Synthetic Event에서 다루게 되므로 자세한 설명은 생략하고 간략하게나마 알려드리자면
trapBubbledEvent()는 명시된 이벤트만 element에 바인딩하고ensureListeningTo()는 명시된 이벤트이외에도 해당 이벤트와 의존성을 가지고 있는 이벤트를 document에 이벤트 위임 형식으로 바인딩합니다. ex) onChange -
ReactDOMInputInitWrapperState()24 와ReactDOMInputGetHostProps()25 는 리액트에서 input 태그를 다룸에 있어 기본적으로 필요한 속성들을 추가합니다.react-dom > client > ReactDOMInput.js
// ReactDOMInputInitWrapperState function initWrapperState(element: Element, props: Object) { const node = element const defaultValue = props.defaultValue == null ? '' : props.defaultValue node._wrapperState = { initialChecked: props.checked != null ? props.checked : props.defaultChecked, initialValue: getToStringValue( props.value != null ? props.value : defaultValue ), controlled: isControlled(props), } } function isControlled(props) { const usesChecked = props.type === 'checkbox' || props.type === 'radio' return usesChecked ? props.checked != null : props.value != null } // ReactDOMInputGetHostProps function getHostProps(element: Element, props: Object) { const node = element const checked = props.checked const hostProps = Object.assign({}, props, { defaultChecked: undefined, defaultValue: undefined, value: undefined, checked: checked != null ? checked : node._wrapperState.initialChecked, }) return hostProps } -
setInitialDOMProperties()34 는 호스트 컴포넌트가 가지고 있는 props를 element에 적용하는 함수입니다.
하지만 호스트 입장에서는 이렇게 넘어오는 props를 날것 그대로 사용할 수 없으므로 각 종류에 맞춰 가공처리가 필요합니다.react-dom > client > ReactDOMComponent.js
function setInitialDOMProperties( tag: string, domElement: Element, rootContainerElement: Element | Document, nextProps: Object, isCustomComponentTag: boolean ): void { for (const propKey in nextProps) { if (!nextProps.hasOwnProperty(propKey)) { continue } const nextProp = nextProps[propKey] if (propKey === STYLE) { setValueForStyles(domElement, nextProp) } else if (propKey === DANGEROUSLY_SET_INNER_HTML) { const nextHtml = nextProp ? nextProp[HTML] : undefined if (nextHtml != null) { setInnerHTML(domElement, nextHtml) } } else if (propKey === CHILDREN) { if (typeof nextProp === 'string') { setTextContent(domElement, nextProp) } else if (typeof nextProp === 'number') { setTextContent(domElement, '' + nextProp) } } else if (registrationNameModules.hasOwnProperty(propKey)) { if (nextProp != null) { ensureListeningTo(rootContainerElement, propKey) } } else if (nextProp != null) { setValueForProperty(domElement, propKey, nextProp, isCustomComponentTag) } } }registrationNameModules29 는 HTML 모든 이벤트를 on***의 형태로 가지고 있으며 이 또한 추후에 Synthetic Event에서 다룹니다.props를 처리하는 함수들은 다음 링크를 통해 확인하세요.
다음은 기존 current를 재사용 했을 때 current와 workInProgress 사이의 변경점을 찾아 어떻게 HTML element에 적용하는지 알아보겠습니다.
2) HTML element 업데이트
reconciler > ReactFiberCompleteWork.js
function completeWork(current, workInProgress, renderExpirationTime) {
  // const newProps = workInProgress.pendingProps
  switch (workInProgress.tag) {
    /*...*/
    case HostComponent: {
      // var rootContainerInstance = getRootHostContainer();
      // const type = workInProgress.type;
      if (current !== null && workInProgress.stateNode != null) {
        // element 업데이트
        updateHostComponent(
          current,
          workInProgress,
          type,
          newProps,
          rootContainerInstance,
        );
      } else {
        /*
        element 생성
        let instance = createInstance(...);
        appendAllChildren(instance, ...);
        ...
        */
    }
    /*...*/
  }
}updateHostComponent()11 는 current와 workInProgress 사이의 차이점을 찾아내 Commit phase에서 소비할 수 있도록 가공해놓습니다. 실질적으로 props가 element에 반영되는 시점은 Commit phase 입니다.
reconciler > ReactFiberCompleteWork.js
function updateHostComponent(
  current: Fiber,
  workInProgress: Fiber,
  type: Type,
  newProps: Props,
  rootContainerInstance: Container
) {
  const oldProps = current.memoizedProps
  // 경로 최적화를 이용한 경우 변경된 부분이 없으므로
  if (oldProps === newProps) {
    return
  }

  const instance: Instance = workInProgress.stateNode
  const updatePayload = prepareUpdate(
    instance,
    type,
    oldProps,
    newProps,
    rootContainerInstance
  )
  workInProgress.updateQueue = updatePayload
  if (updatePayload) {
    markUpdate(workInProgress)
  }
}prepareUpdate()는 변경점을 찾아 가공된 데이터를 반환16 합니다. 여기에는 추가, 수정, 삭제 해야 될 속성들이 담겨있습니다.- 이것을 workInProgress의
updateQueue에 담아23 놓습니다. 일전에도 updateQueue를 다룬적이 있습니다. 그때는 커스텀 컴포넌트의 updateQueue였으며 라이프 사이클 hook 정보가 저장된다고 언급했습니다. - 그리고
updatePayload가 비어 있지 않다면24 Commit phase에서 element를 수정해야 하므로 Update tag를 달아25 줍니다.
react-dom > client > ReactDOMHostConfig.js
function prepareUpdate(
  domElement: Instance,
  type: string,
  oldProps: Props,
  newProps: Props,
  rootContainerInstance: Container,
  hostContext: HostContext
): null | Array<mixed> {
  return diffProperties(
    domElement,
    type,
    oldProps,
    newProps,
    rootContainerInstance
  )
}
변경점을 추출할 때는 다음의 두 단계로 나누어 처리합니다(
- 삭제: current를 기준으로 workInProgress에 없다면 삭제이다.
- 추가, 수정: workInProgress를 기준으로 current에 없다면 추가, 값이 다르다면 수정이다.
즉 current, workInProgress 기준으로 각각 한번의 전진으로 처리합니다. 이때 style만은 유일하게 추가, 수정, 삭제가 모두 한번에 일어날 수 있으므로 다른 속성들과는 조금 다르게 처리합니다.
react-dom > client > ReactDOMComponent.js
function diffProperties(
  domElement: Element,
  tag: string,
  lastRawProps: Object,
  nextRawProps: Object,
  rootContainerElement: Element | Document
): null | Array<mixed> {
  // 변경점을 담을 저장소로 [[key, value], ...]의 형태를 취함.
  let updatePayload: null | Array<any> = null

  let lastProps: Object
  let nextProps: Object

  // 기본 속성 추가
  switch (tag) {
    case 'input':
      lastProps = ReactDOMInputGetHostProps(domElement, lastRawProps)
      nextProps = ReactDOMInputGetHostProps(domElement, nextRawProps)
      updatePayload = []
      break
    // option, select, textarea...
  }

  let propKey
  let styleName
  let styleUpdates = null // style은 임시 변수를 두고 변경점을 추출하여 담아둔다.

  // 삭제
  for (propKey in lastProps) {
    if (
      nextProps.hasOwnProperty(propKey) || // workInProgress에 있다면 삭제가 아니다.
      !lastProps.hasOwnProperty(propKey) ||
      lastProps[propKey] == null
    ) {
      continue
    }
    // 이하 workInProgress에는 존재하지 않는 속성들이므로 모두 삭제해준다.
    if (propKey === STYLE) {
      const lastStyle = lastProps[propKey]
      for (styleName in lastStyle) {
        if (lastStyle.hasOwnProperty(styleName)) {
          if (!styleUpdates) {
            styleUpdates = {}
          }
          styleUpdates[styleName] = ''
        }
      }
    } else {
      (updatePayload = updatePayload || []).push(propKey, null)
    }
  }

  // 추가, 수정
  for (propKey in nextProps) {
    const nextProp = nextProps[propKey]
    const lastProp = lastProps != null ? lastProps[propKey] : undefined
    if (
      !nextProps.hasOwnProperty(propKey) ||
      nextProp === lastProp ||
      (nextProp == null && lastProp == null)
    ) {
      continue
    }

    if (propKey === STYLE) {
      // style은 추가, 수정, 삭제가 동시에 일어날 수 있음.
      // current에만 존재하면 삭제하면 그만이지만 그렇지 않을 경우 모든 케이스에 대한 처리가 필요함.

      // 추가, 삭제, 수정
      if (lastProp) {
        for (styleName in lastProp) {
          // 삭제
          if (
            lastProp.hasOwnProperty(styleName) &&
            (!nextProp || !nextProp.hasOwnProperty(styleName))
          ) {
            if (!styleUpdates) {
              styleUpdates = {}
            }
            styleUpdates[styleName] = ''
          }
        }
        // 추가, 수정
        for (styleName in nextProp) {
          if (
            nextProp.hasOwnProperty(styleName) &&
            lastProp[styleName] !== nextProp[styleName]
          ) {
            if (!styleUpdates) {
              styleUpdates = {}
            }
            styleUpdates[styleName] = nextProp[styleName]
          }
        }
        // 추가
      } else {
        if (!styleUpdates) {
          if (!updatePayload) {
            updatePayload = []
          }
          updatePayload.push(propKey, styleUpdates)
        }
        styleUpdates = nextProp
      }
    } else if (propKey === DANGEROUSLY_SET_INNER_HTML) {
      const nextHtml = nextProp ? nextProp[HTML] : undefined
      const lastHtml = lastProp ? lastProp[HTML] : undefined
      if (nextHtml != null) {
        if (lastHtml !== nextHtml) {
          (updatePayload = updatePayload || []).push(
            propKey,
            toStringOrTrustedType(nextHtml) // return '' + nextHtml
          )
        }
      }
    } else if (propKey === CHILDREN) {
      if (
        lastProp !== nextProp &&
        (typeof nextProp === 'string' || typeof nextProp === 'number')
      ) {
        (updatePayload = updatePayload || []).push(propKey, '' + nextProp)
      }
    } else if (registrationNameModules.hasOwnProperty(propKey)) {
      if (nextProp != null) {
        ensureListeningTo(rootContainerElement, propKey)
      }
      if (!updatePayload && lastProp !== nextProp) {
        updatePayload = []
      }
    } else {
      (updatePayload = updatePayload || []).push(propKey, nextProp)
    }
  }

  // style 변경점을 가지고 있는 styleUpdates를 마지막으로 추가하면서 마무리한다.
  if (styleUpdates) {
    (updatePayload = updatePayload || []).push(STYLE, styleUpdates)
  }
  return updatePayload
}
completeWork()의 첫 번째 역할인 호스트 영역에 대한 작업(
다음은 side-effect를 가지고 있는 fiber를 Effect list로 연결하는 두번 째 역할을 보도록 하겠습니다.
6 - 9 Effect list 연결
Work를 진행하며 발생한 VDOM에 산재되어 있는 side-effect을 어떻게 하면 Commit phase에서 편하게 사용할 수 있을까요? 그냥 Host root부터 시작해서 밑으로 내려가며 Effect를 소비하면 될까요?
다행히도 Effect를 쉽게 수거해 갈 타이밍이 있습니다. 일전에 언급한 Work 마무리 순서를 생각해보시면 됩니다. 후위 순회이기 때문에 Host root로 되돌아가는데 이때 우리는 Effect만 위로 엮어주기만 하면 됩니다. 이렇게 되면 최종적으로 Host root는 side-effect가 발생한 fiber들이 모두 엮여있는 리스트의 head를 가지고 있게 됩니다. 이제 Commit phase에서는 root만 참조할 수 있으면 됩니다.
reconciler > ReactFiberWorkLoop.js
function completeUnitOfWork(unitOfWork: Fiber): Fiber | null {
  /*
  workInProgress = unitOfWork
  do {
  const current = workInProgress.alternate
  const returnFiber = workInProgress.return

  if ((workInProgress.effectTag & Incomplete) === NoEffect) {
    completeWork(current, workInProgress, renderExpirationTime);
  */
    if (
      returnFiber !== null &&
      (returnFiber.effectTag & Incomplete) === NoEffect
    ) {
      // effect list의 head를 위로 올린다.
      if (returnFiber.firstEffect === null) {
        returnFiber.firstEffect = workInProgress.firstEffect
      }
      // 서브 트리의 effect list를 부모 list 뒤에 연결한다.
      if (workInProgress.lastEffect !== null) {
        if (returnFiber.lastEffect !== null) {
          returnFiber.lastEffect.nextEffect = workInProgress.firstEffect
        }
        returnFiber.lastEffect = workInProgress.lastEffect
      }
      // 자신도 side-effect를 품고 있다면 부모 list에 연결한다.
      const effectTag = workInProgress.effectTag
      if (effectTag > PerformedWork) {        if (returnFiber.lastEffect !== null) {
          returnFiber.lastEffect.nextEffect = workInProgress
        } else {
          returnFiber.firstEffect = workInProgress
        }
        returnFiber.lastEffect = workInProgress
      }
    }
  /*
  } else {
    부모의 서브트리에서 Work를 진행하던 중 에러가 발생한 경우.
  }

  const siblingFiber = workInProgress.sibling
  if (siblingFiber !== null) {
    return siblingFiber
  }

  workInProgress = returnFiber
  } while (workInProgress !== null)

  return null
  */
}-
하이라이트 코드만 설명하고 넘어가겠습니다.
기억 안나실 수 있지만
PerformedWorktag는 updateFunctionComponent()4 에서 커스텀 컴포넌트를 호출한 후에 달아주었습니다. 부등호(> )를 통해 짐작해보자면 커스텀 컴포넌트의 호출 이외에 side-effect가 발생한다면 자신을 Effect로 간주하고 위로 올린다고 해석하시면 되겠습니다.shared > ReactSideEffectTags.js
export const NoEffect = /*              */ 0b0000000000000
export const PerformedWork = /*         */ 0b0000000000001
export const Placement = /*             */ 0b0000000000010
export const Update = /*                */ 0b0000000000100
/*...*/
completeUnitOfWork()를 통해 Host root까지 올라왔다면 더 이상의 Work를 진행할 노드가 남아 있지 않으므로 자연스레 workLoop()의 반복은 중단될 것입니다.
function workLoopSync() {
  while (workInProgress !== null) {
    workInProgress = performUnitOfWork(workInProgress)
  }
}
우리는 다시 Work의 진입점이었던 performSyncWorkOnRoot()로 돌아가게 됩니다.
reconciler > ReactFiberWorkLoop.js
function performSyncWorkOnRoot(root) {
  /*...*/
  // if (..) prepareFreshStack(root, expirationTime);

  if (workInProgress !== null) {
    const prevExecutionContext = executionContext
    executionContext |= RenderContext
    do {
      try {
        workLoopSync()
        break
      } catch (thrownValue) {
        handleError(root, thrownValue)
      }
    } while (true)
    executionContext = prevExecutionContext
    // Commit phase..
  }

  return null // 잔여 작업이 없으므로 null을 리턴.
}
이전 context로 다시 설정해줌으로써 Render phase가 끝나게 됩니다.
이번에도 마찬가지로 Todo를 통해 컴포넌트의 호출부터 side-effect tag가 어떤 순서로 달리고 Effect가 어떻게 Host root까지 전달되는지 확인해봅시다.
Effect list 연결 로직의 커버리지를 위해 useEffect를 Input 컴포넌트에 추가합니다.
function Input({ submit }) {
  const [value, setValue] = useState('')

  useEffect(() => {    console.log('Deep dive magic code')  })
  return (...);
}
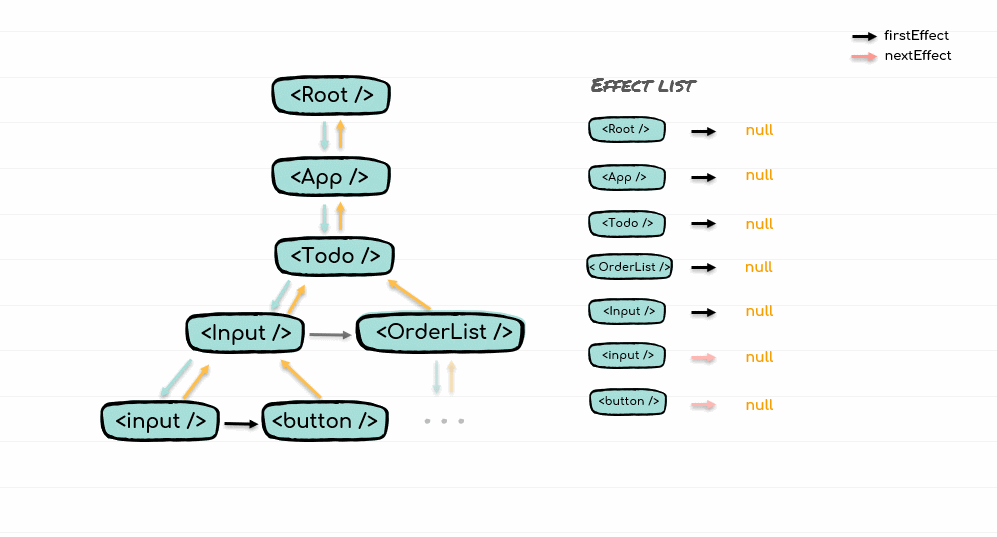
Render phase를 거치고 나면 Host root는 Effect 리스트의 head를 가지고 있게 됩니다. 이제 Commit phase에서 Host root의 firstEffect 참조를 통해 모든 변경점에 접근할 수 있게 되었습니다.
호스트 컴포넌트의 tag 4는 Update(
props 변경 ), Input 컴포넌트의 tag 517은 Passive(useEffect ) + Update(useState 상태 변경 ) + PerformedWork 나타냅니다.
다음 포스트는 Render phase를 진행하며 발생한 Effect을 Commit phase에서 어떻게 소비하는지, 라이프 사이클은 어느 시점에 동작하는지 등을 확인하며 reconciler 시리즈를 마무리합니다.