React 톺아보기 - 05. Reconciler_5
4 years ago
모든 설명은 v16.12.0 버전 함수형 컴포넌트와 브라우저 환경을 기준으로 합니다. 버전에 따라 코드는 변경될 수 있으며 클래스 컴포넌트는 설명에서 제외됨을 알려 드립니다.
포스트별 주제
- 훅을 통해 컴포넌트 상태를 업데이트한다.
- 업데이트를 반영할 Work를 scheduler에게 전달하고 scheduler는 스케줄링된 Task를 적절한 시기에 실행한다.
- Work을 통해 VDOM 재조정 작업을 진행한다.
-
Work를 진행하며 발생한 변경점을 적용한다.
- 사용자의 상호작용으로 이벤트가 발생하고 등록된 핸들러가 실행되면서 다시 1번으로 되돌아간다.
7. Commit phase
reconciler > ReactFiberWorkLoop.js
function performSyncWorkOnRoot(root) {
  /*...*/
  if (workInProgress !== null) {
    /* Render phase.. */
    // executionContext = prevExecutionContext

    if (workInProgress !== null) {
      invariant(
        false,
        'Cannot commit an incomplete root. This error is likely caused by a ' +
          'bug in React. Please file an issue.'
      )
    } else {
      root.finishedWork = root.current.alternate
      root.finishedExpirationTime = expirationTime
      finishSyncRender(root, workInProgressRootExitStatus, expirationTime)
    }
  }

  return null // 잔여 작업이 없으므로 null을 리턴.
}

function finishSyncRender(root, exitStatus, expirationTime) {
  workInProgressRoot = null
  commitRoot(root)
}
Commit phase에 진입하기에 앞서 Render phase가 잘 마무리 되었는지 확인해야 됩니다.
performSyncWorkOnRoot()는 Render phase를 동기적으로 처리하므로 정상적으로 끝났다면 workInProgress는 null
7 - 1 finishSyncRender()
Render phase와는 다르게 Commit phase에서는 sub-phase가 추가적으로 존재합니다.
각 sub-phase는 Effect를 소비한다는 큰 맥락은 같지만 소비 시점의 차이가 있습니다.
크게 Effect의 성격에 따라 나뉘어 지며 DOM에 변형을 가하는 시점과 그 전, 후로 나뉘어 집니다.
전
- 클래스 컴포넌트: getSnapshotBeforeUpdate
- 함수형 컴포넌트: clean-up-useEffect, useEffect
- 호스트 컴포넌트: X
변형
- 클래스 컴포넌트: componentWillUnmount
- 함수형 컴포넌트: clean-up-useLayoutEffect, clean-up-useEffect
- 호스트 컴포넌트: element 삽입, 수정, 삭제
후
- 클래스 컴포넌트: componentDidMount, componentDidUpdate
- 함수형 컴포넌트: useLayoutEffect
- 호스트 컴포넌트: auto-focus
위 작업은 useEffect()를 제외하고는 모두 동기적으로 처리됩니다. 이 내용은 중요한 부분으로 DOM 변경과 화면 렌더링 사이 또는 렌더링 이후 개발자가 개입할 수 있도록 해줍니다. 함수형 컴포넌트의 경우 각각 useLayoutEffect()와 useEffect()가 이에 해당합니다.
function finishSyncRender(root, exitStatus, expirationTime) {
  // Set this to null to indicate there's no in-progress render.
  workInProgressRoot = null;
  commitRoot(root);
}

function commitRoot(root) {
  const renderPriorityLevel = getCurrentPriorityLevel();
  runWithPriority(
    ImmediatePriority,
    commitRootImpl.bind(null, root, renderPriorityLevel),
  );
  return null;
}
reconciler > ReactFiberWorkLoop.js
function commitRootImpl(root, renderPriorityLevel) {
  const finishedWork = root.finishedWork
  const expirationTime = root.finishedExpirationTime
  if (finishedWork === null) {
    return null
  }

  // 초기화
  root.finishedWork = null
  root.finishedExpirationTime = NoWork
  root.callbackNode = null
  root.callbackExpirationTime = NoWork
  root.callbackPriority = NoPriority
  root.nextKnownPendingLevel = NoWork

  // Effect list의 head를 가지고 온다.
  let firstEffect
  if (finishedWork.effectTag > PerformedWork) {
    if (finishedWork.lastEffect !== null) {
      finishedWork.lastEffect.nextEffect = finishedWork
      firstEffect = finishedWork.firstEffect
    } else {
      firstEffect = finishedWork
    }
  } else {
    // There is no effect on the root.
    firstEffect = finishedWork.firstEffect
  }

  if (firstEffect !== null) {
    const prevExecutionContext = executionContext
    executionContext |= CommitContext

    // 전
    nextEffect = firstEffect
    do {
      try {
        commitBeforeMutationEffects()      } catch (error) {
        invariant(nextEffect !== null, 'Should be working on an effect.')
        captureCommitPhaseError(nextEffect, error)
        nextEffect = nextEffect.nextEffect
      }
    } while (nextEffect !== null)

    // 변형
    nextEffect = firstEffect
    do {
      try {
        commitMutationEffects(root, renderPriorityLevel)      } catch (error) {
        invariant(nextEffect !== null, 'Should be working on an effect.')
        captureCommitPhaseError(nextEffect, error)
        nextEffect = nextEffect.nextEffect
      }
    } while (nextEffect !== null)

    // workInProgress tree를 DOM에 적용했으니 이젠 current로 취급한다.
    root.current = finishedWork

    // 후
    nextEffect = firstEffect
    do {
      try {
        commitLayoutEffects(root, expirationTime)      } catch (error) {
        invariant(nextEffect !== null, 'Should be working on an effect.')
        captureCommitPhaseError(nextEffect, error)
        nextEffect = nextEffect.nextEffect
      }
    } while (nextEffect !== null)

    nextEffect = null

    // 브라우저가 화면을 렌더링 할 수 있도록 scheduler에게 알린다.
    requestPaint()
    executionContext = prevExecutionContext
  } else {
    // No effects.
    root.current = finishedWork
  }

  // Passive effect(useEffect)를 위한 설정
  const rootDidHavePassiveEffects = rootDoesHavePassiveEffects
  if (rootDoesHavePassiveEffects) {
    // 화면이 그려지고 난 후에 실행될 effect들이 아직 남아 있으므로 root를 잡아둔다.
    rootDoesHavePassiveEffects = false    rootWithPendingPassiveEffects = root    pendingPassiveEffectsExpirationTime = expirationTime    pendingPassiveEffectsRenderPriority = renderPriorityLevel  } else {
    // Passive effect가 없으면 effect를 모두 소비한 것이므로 GC를 위해 참조를 끊어준다.
    nextEffect = firstEffect
    while (nextEffect !== null) {
      const nextNextEffect = nextEffect.nextEffect
      nextEffect.nextEffect = null
      nextEffect = nextNextEffect
    }
  }

  ensureRootIsScheduled(root)
  flushSyncCallbackQueue()
  return null
}- 39, 51, 66: sub-phase
- 79:
requestPaint()의 설명은 일전에 다루었던 내용으로 대체합니다. - 89 ~ 92: useEffect()의 경우 브라우저가 화면을 그리고 난 후에 실행되는 Effect입니다. 그러기 위해 Effect 소비 함수를 shceduler에게 다음 프레임에 실행하도록 요청하는데, 이때 Effect list를 가지고 있는 root를 참조할 수 있어야 하므로 잡아
90 둘 필요가 있습니다. - 103, 104: Commit phase를 진행하는 와중에 추가적인 작업이 스케줄링될 경우를 대비합니다.
본격적으로 Commit phase를 시작하겠습니다.
7 - 2 commitBeforeMutationEffects()
Effect를 소비하는 방식은 간단합니다. firstEffect부터 lastEffect까지 순회하며 현재 시점에 처리해야되는 Effect를 tag를 이용하여 필터링한 후 소비하는 방식입니다.
reconciler > ReactFiberWorkLoop.js
function commitBeforeMutationEffects() {
  while (nextEffect !== null) {    const effectTag = nextEffect.effectTag
    // 클래스 컴포넌트의 getSnapshotBeforeUpdate()
    if ((effectTag & Snapshot) !== NoEffect) {
      const current = nextEffect.alternate
      commitBeforeMutationEffectOnFiber(current, nextEffect)
    }

    // useEffect()를 사용하면 Passive tag가 달린다.
    if ((effectTag & Passive) !== NoEffect) {
      if (!rootDoesHavePassiveEffects) {
        rootDoesHavePassiveEffects = true // root를 잡아둬야 하는지 알려주는 플래그
        // 다음 프레임이 실행될 수 있도록 Passive effect 소비 함수 전달
        scheduleCallback(NormalPriority, () => {
          flushPassiveEffects()
          return null
        })
      }
    }

    nextEffect = nextEffect.nextEffect  }
}
Passive tag는 useEffect() 구현체에서 달아줍니다.
1) commitBeforeMutationEffectOnFiber()
reconciler > ReactFiberCommitWork.js
function commitBeforeMutationLifeCycles(current, finishedWork) {
  switch (finishedWork.tag) {
    case FunctionComponent:
    case ForwardRef:
    case SimpleMemoComponent: {
      // noop
      return
    }
    case ClassComponent: {
      if (finishedWork.effectTag & Snapshot) {
        if (current !== null) {
          const prevProps = current.memoizedProps
          const prevState = current.memoizedState
          const instance = finishedWork.stateNode // class instance
          const snapshot = instance.getSnapshotBeforeUpdate(            finishedWork.elementType === finishedWork.type
              ? prevProps
              : resolveDefaultProps(finishedWork.type, prevProps), // defaultProps 적용
            prevState
          )
          instance.__reactInternalSnapshotBeforeUpdate = snapshot        }
      }
      return
    }
    //HostRoot, HostComponent..
    default: {
      invariant(
        false,
        'This unit of work tag should not have side-effects. This error is ' +
          'likely caused by a bug in React. Please file an issue.'
      )
    }
  }
}
클래스 컴포넌트는 DOM 변형전에 snapshot을 찍어놓기 위해 현재 시점에 getSnapshotBeforeUpdate()를 호출합니다.
그리고 돔 변형 이후에 componentDidUpdate(prevProps, prevState, snapshot)에서 사용할 수 있도록 instance에 저장해 놓습니다.
2) flushPassiveEffects()
설명을 계속 미뤄두었던 useEffect()가 나올 차례입니다.
먼저 아래 이미지를 통해 훅의 실행 흐름을 정확하게 짚고 넘어가겠습니다.
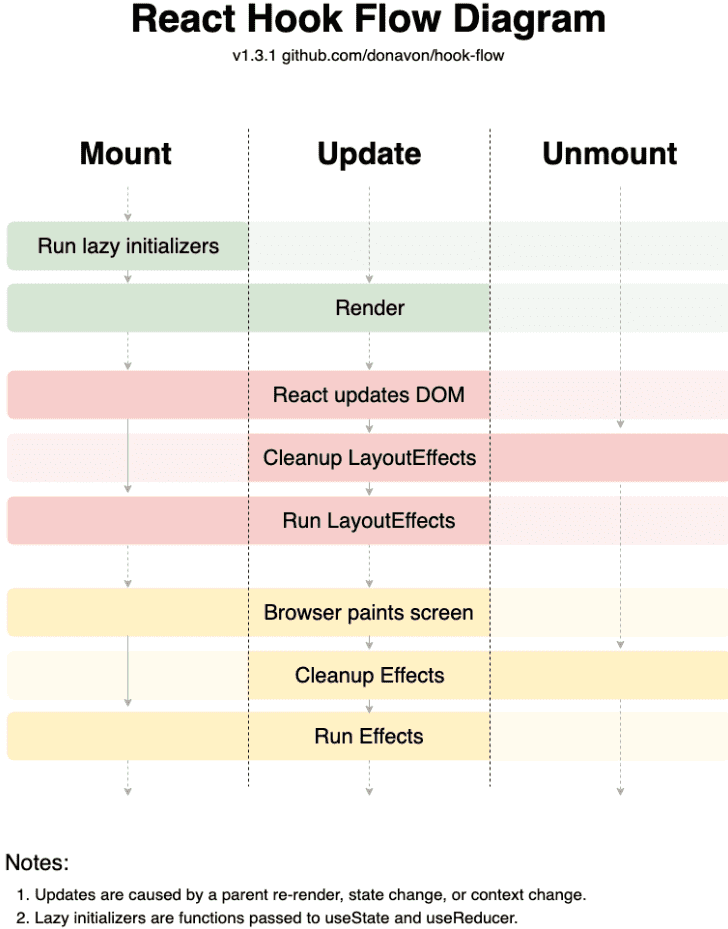
대부분의 훅이 Render에서 소비되는 것과는 달리 useEffect(), useLayoutEffect()는 Commit phase에서 소비됩니다.
useEffect()와 useLayoutEffect()는 라이프 사이클 Effect를 생성한다는 점은 같지만 소비 시점의 차이가 존재합니다.
다이어그램을 참고하여 소비 시점을 확인해보자면 리액트가 DOM을 업데이트하는 React updates DOM, 브라우저가 화면을 렌더링하는 Browser paints screen 이후에 각각 실행됩니다. 이때 주의깊게 볼만한 점은 새로운 훅 실행 바로 직전에 clean-up function을 호출한다는 것입니다.
useEffect()를 예로 들면 컴포넌트의 상태가 업데이트되어 리-렌더링이 진행될 때 바로 clean-up function을 호출하는게 아닌 다음 프레임에 새로운 useEffect()를 호출하기 바로 직전에 실행된다는 것입니다.
reconciler > ReactFiberWorkLoop.js
function flushPassiveEffectsImpl() {
  // commitRoot()에서 잡아두었던 root
  if (rootWithPendingPassiveEffects === null) {
    return false
  }

  const root = rootWithPendingPassiveEffects
  // 전역 변수 정리
  rootWithPendingPassiveEffects = null
  pendingPassiveEffectsExpirationTime = NoWork

  invariant(
    (executionContext & (RenderContext | CommitContext)) === NoContext,
    'Cannot flush passive effects while already rendering.'
  )

  const prevExecutionContext = executionContext
  executionContext |= CommitContext

  let effect = root.current.firstEffect
  while (effect !== null) {
    try {
      commitPassiveHookEffects(effect)
    } catch (error) {
      invariant(effect !== null, 'Should be working on an effect.')
      captureCommitPhaseError(effect, error)
    }
    const nextNextEffect = effect.nextEffect
    // Remove nextEffect pointer to assist GC
    effect.nextEffect = null
    effect = nextNextEffect
  }

  executionContext = prevExecutionContext

  return true
}
reconciler > ReactFiberCommitWork.js
import {
  NoEffect as NoHookEffect,
  UnmountPassive,
  MountPassive,
} from './ReactHookEffectTags';

function commitPassiveHookEffects(finishedWork: Fiber): void {
  if ((finishedWork.effectTag & Passive) !== NoEffect) {
    switch (finishedWork.tag) {
      case FunctionComponent:
      case ForwardRef:
      case SimpleMemoComponent: {
        commitHookEffectList(UnmountPassive, NoHookEffect, finishedWork)
        commitHookEffectList(NoHookEffect, MountPassive, finishedWork)
        break
      }
      default:
        break
    }
  }
}commitHookEffectList()는 라이프 사이클 Effect를 소비하는 함수이며 먼저 useEffect(), useLayoutEffect()가 해당 Effect를 어떻게 생성하는지 부터 확인하고 가겠습니다.
Life cycle effect 생성
useEffect()와 useLayoutEffect()는 로직이 비슷하므로 같이 설명하도록 하겠습니다.
훅은 아시다시피 mount와 update 두 개의 실행환경으로 분류됩니다.
reconciler > ReactFiberHooks.js
import {
  Update as UpdateEffect,
  Passive as PassiveEffect,
} from 'shared/ReactSideEffectTags';
import {
  UnmountMutation,
  MountLayout,
  UnmountPassive,
  MountPassive,
} from './ReactHookEffectTags';

// useEffect()
function mountEffect(
  create: () => (() => void) | void,
  deps: Array<mixed> | void | null
): void {
  return mountEffectImpl(
    UpdateEffect | PassiveEffect,    UnmountPassive | MountPassive,    create,
    deps
  )
}
// useLayoutEffect()
function mountLayoutEffect(
  create: () => (() => void) | void,
  deps: Array<mixed> | void | null
): void {
  return mountEffectImpl(
    UpdateEffect,    UnmountMutation | MountLayout,    create,
    deps
  )
}- 훅의 첫번째 인자로 넘어오는 함수를
create, create()가 반환하는 함수를destroyclean-up 라고 명칭합니다. mountEffectImpl()의 첫 번째 인자로 넘겨주는 tag는 fiber에 새겨지며 두 번째 인자 tag는 라이프 사이클 Effect에 새겨집니다.
reconciler > ReactFiberHooks.js
function mountEffectImpl(fiberEffectTag, hookEffectTag, create, deps): void {
  const hook = mountWorkInProgressHook()
  const nextDeps = deps === undefined ? null : deps
  sideEffectTag |= fiberEffectTag
  hook.memoizedState = pushEffect(hookEffectTag, create, undefined, nextDeps)
}
mountWorkInProgressHook()가 기억 안나시는 분은 hooks_1를 참고하세요.
-
sideEffectTag5 는 workInProgress에 side-effect tag를 새겨넣기 위한 전역변수입니다. 이 변수는 renderWithHooks()에서 컴포넌트 호출이 끝나고 난 후에 사용됩니다.function renderWithHooks(...) { /*...*/ let children = Component(props, refOrContext); const renderedWork = currentlyRenderingFiber; renderedWork.updateQueue = componentUpdateQueue; // 라이프 사이클 Effect list renderedWork.effectTag |= sideEffectTag; /*...*/ } pushEffect()6 에 create(), destroy()를 전달하여 라이프 사이클 hook을 만들고 저장합니다.
reconciler > ReactFiberHooks.js
function pushEffect(tag, create, destroy, deps) {
  const effect: Effect = {
    tag,
    create,
    destroy,
    deps,
    next: null,
  }
  if (componentUpdateQueue === null) {
    componentUpdateQueue = createFunctionComponentUpdateQueue() // return { lastEffect: null }
    componentUpdateQueue.lastEffect = effect.next = effect
  } else {
    const lastEffect = componentUpdateQueue.lastEffect
    if (lastEffect === null) {
      componentUpdateQueue.lastEffect = effect.next = effect // circular
    } else {
      const firstEffect = lastEffect.next // circular
      lastEffect.next = effect
      effect.next = firstEffect
      componentUpdateQueue.lastEffect = effect
    }
  }
  return effect
}- 컴포넌트 호출 와중에 생성되는 라이프 사이클 Effect들은
componentUpdateQueue에 담기게 됩니다. - 세번째 인자로 넘어오는 destroy는 컴포넌트 마운트 시점에서는 undefined로 넘어옵니다. 이 destroy는 현재 시점에서는 얻어낼 수 없고 소비 시점에 가서야 create를 호출해 clean-up 함수를 저장할 수 있습니다.
잠시 헷갈릴 수 있으므로 리액트에서 저장소로 다루는 것들에 대해 짧게 정리하고 넘어가겠습니다.
- 컴포넌트의 side-effect를 담고 있는 fiber의 firstEffect, nextEffect, lastEffect
- 함수형 컴포넌트에서 사용되는 훅들의 리스트를 담고 있는 fiber의 memoizedState
- 함수형 컴포넌트의 라이프 사이클 Effect를 담고 있는 fiber의 updateQueue
위에서 연급된 저장소들 중 다른 곳에서도 사용되는 것들을 정리해보자면
- 훅의 memoizedState는 결괏값을 저장합니다. useState()는 action의 결과, useEffect()는 생성된 Effect 등
- 호스트 컴포넌트의 updateQueue에는 변경점을 담는다.
Effect 생성을 보았으니 다음은 업데이트 구현체를 확인해보겠습니다.
마운트 구현체와는 다르게 이전에 실행된 훅도 신경써야 합니다.
reconciler > ReactFiberHooks.js
// useEffect()
function updateEffect(
  create: () => (() => void) | void,
  deps: Array<mixed> | void | null
): void {
  return updateEffectImpl(
    UpdateEffect | PassiveEffect,    UnmountPassive | MountPassive,    create,
    deps,
  );
}

// useLayoutEffect()
function updateLayoutEffect(
  create: () => (() => void) | void,
  deps: Array<mixed> | void | null
): void {
  return updateEffectImpl(
    UpdateEffect,    UnmountMutation | MountLayout,    create,
    deps,
  );
}

function updateEffectImpl(fiberEffectTag, hookEffectTag, create, deps): void {
  const hook = updateWorkInProgressHook()
  const nextDeps = deps === undefined ? null : deps
  let destroy = undefined

  if (currentHook !== null) {
    const prevEffect = currentHook.memoizedState
    destroy = prevEffect.destroy
    if (nextDeps !== null) {
      const prevDeps = prevEffect.deps
      if (areHookInputsEqual(nextDeps, prevDeps)) {
        pushEffect(NoHookEffect, create, destroy, nextDeps)        return
      }
    }
  }

  sideEffectTag |= fiberEffectTag
  hook.memoizedState = pushEffect(hookEffectTag, create, destroy, nextDeps)}
updateWorkInProgressHook()가 기억 안나시는 분은 hooks_2를 참고하세요.
- 이전에 실행된 훅이 없다면
33 비교할 필요 없이 Effect를 바로 생성46 합니다. -
실행된 훅이 존재한다면
33 의존성 배열 유무36 를 확인합니다.- 개발자가 의존성 배열을 사용하지 않았다면 이는 컴포넌트 호출마다 실행되어야 하므로 46 라인으로 넘어갑니다.
- 의존성 배열이 존재한다면 이를 이전 훅의 의존성 배열과 비교
38 합니다.
- 라인 39, 46의 각
pushEffect()의 쓰임새는 약간씩 다릅니다. 39는 컴포넌트가 언마운트될 때 각 훅의 destroy를 실행해주어야하는데 이때 참조할 수 있도록 Effect를 componentUpdateQueue에 추가하는 용도로 쓰입니다. 그래서 create가 실행되지 않도록NoHookEffect를 넘겨주는 것입니다.
3) 라이프 사이클 Effect를 소비하는 commitHookEffectList()
헷갈리지 않도록 아래 4, 5라인의 인자를 눈여겨보세요. 소비하려는 Effect의 tag를 넘겨주고 있는 것입니다.
reconciler > ReactFiberCommitWork.js
// function commitPassiveHookEffects(...) {
//    /*...*/
//    commitHookEffectList(UnmountPassive, NoHookEffect, finishedWork);//    commitHookEffectList(NoHookEffect, MountPassive, finishedWork);// }

function commitHookEffectList(unmountTag, mountTag, finishedWork) {
  const updateQueue = finishedWork.updateQueue
  let lastEffect = updateQueue !== null ? updateQueue.lastEffect : null
  if (lastEffect !== null) {
    const firstEffect = lastEffect.next
    let effect = firstEffect
    do {
      if ((effect.tag & unmountTag) !== NoHookEffect) {
        // Unmount
        const destroy = effect.destroy
        effect.destroy = undefined
        if (destroy !== undefined) {
          destroy()
        }
      }
      if ((effect.tag & mountTag) !== NoHookEffect) {
        // Mount
        const create = effect.create
        effect.destroy = create()
      }
      effect = effect.next
    } while (effect !== firstEffect)
  }
}
clean-up 함수를 실행하기 위해 UnmountPassive tag를 먼저 넘기고MountPassive tag를 가진 Effect를 소비
UnmountPassive와 MountPassive tag는 useEffect() 구현체에서 달아주고 있습니다.
7 - 3 commitMutationEffects()
여기에서는 삽입, 수정, 삭제 Effect가 소비됩니다.
reconciler > ReactFiberWorkLoop.js
function commitMutationEffects(root: FiberRoot, renderPriorityLevel) {
  while (nextEffect !== null) {
    const effectTag = nextEffect.effectTag

    if (effectTag & ContentReset) {
      commitResetTextContent(nextEffect) // node.textContent = text
    }

    let primaryEffectTag = effectTag & (Placement | Update | Deletion)

    switch (primaryEffectTag) {
      case Placement: {
        commitPlacement(nextEffect)
        nextEffect.effectTag &= ~Placement
        break
      }
      case PlacementAndUpdate: {
        commitPlacement(nextEffect)
        nextEffect.effectTag &= ~Placement
        const current = nextEffect.alternate
        commitWork(current, nextEffect)
        break
      }
      case Update: {
        const current = nextEffect.alternate
        commitWork(current, nextEffect)
        break
      }
      case Deletion: {
        commitDeletion(root, nextEffect, renderPriorityLevel)
        break
      }
    }

    nextEffect = nextEffect.nextEffect
  }
}
1) commitPlacement
DOM에 element 삽입(이동, 추가)을 처리하기 위해선 다음의 두 가지 컴포넌트가 필요합니다.
- 부모 호스트 컴포넌트
- Placement tag가 달려있지 않은 형제 컴포넌트
1의 경우 당연히 현재 element를 삽입하기 위해선 부모가 필요합니다.
2는 필요할 수도 있고 없을 수도 있습니다. 무슨 말이냐면 element 이동이나 추가할 때 가장 이상적인 방법은 그냥 부모의 자식 노드 맨 뒤에 삽입 하는 것입니다. 하지만 기존 형제가 그 자리에 가만히 있을 경우 그리고 새로 삽입할 element의 위치가 해당 형제보다 앞에 위치해야 할 경우 앞에서 설명한 이상적인 방법은 사용할 수 없고 다른 방법을 모색해야 합니다. 이럴때 삽입 위치의 오른쪽 형제가 필요합니다. 그래야 해당 형제 노드를 기준으로 삽입할 수 있습니다.
이를위해 형제를 참조할 때 주의해야될 중요한 점은 형제 노드에 Placement tag가 달려 있으면 안된다는 점입니다. 왜냐면 Effect list의 순서는 후위 순회이므로 왼쪽부터 삽입됩니다. 그런데 형제 노드에 Placement tag가 달려있을 경우 VDOM에서는 참조 가능하지만 DOM 환경에서는 형제 노드의 삽입 처리가 되기전입니다. 그래서 Pacement tag가 달려있지 않은 형제를 찾아 기준점을 삼아야합니다.
필요한 컴포넌트들을 준비했다면 마지막으로는 삽입 대상인 호스트 컴포넌트를 찾아내야 합니다.
Placement tag는 커스텀 컴포넌트에도 달릴 수 있으므로 필터링이 필요합니다. 이때의 로직은 기존에 다루었던 appendAllChildren()와 비슷합니다.
삽입할 부모 찾기
reconciler > ReactFiberCommitWork.js
function commitPlacement(finishedWork: Fiber): void {
  // Recursively insert all host nodes into the parent.
  const parentFiber = getHostParentFiber(finishedWork)
  let parent
  let isContainer
  const parentStateNode = parentFiber.stateNode
  // 부모 HTML element 추출
  switch (parentFiber.tag) {
    case HostComponent:
      parent = parentStateNode
      isContainer = false
      break
    case HostRoot:
      // Host root의 stateNode는 root이므로 containerInfo에서 꺼내야 합니다.
      parent = parentStateNode.containerInfo
      isContainer = true
      break
    /*...*/
    default:
      invariant(
        false,
        'Invalid host parent fiber. This error is likely caused by a bug ' +
          'in React. Please file an issue.'
      )
  }
  /*...*/
}

function getHostParentFiber(fiber: Fiber): Fiber {
  let parent = fiber.return
  while (parent !== null) {
    if (isHostParent(parent)) {       return parent
    }
    parent = parent.return
  }
  invariant(
    false,
    'Expected to find a host parent. This error is likely caused by a bug ' +
      'in React. Please file an issue.'
  )
}

function isHostParent(fiber: Fiber): boolean {
  return (
    fiber.tag === HostComponent ||
    fiber.tag === HostRoot ||
    fiber.tag === HostPortal
  )
}
삽입할 기준이 되는 형제 찾기
reconciler > ReactFiberCommitWork.js
function commitPlacement(finishedWork: Fiber): void {
  // const parentFiber = getHostParentFiber(finishedWork)
  // switch (parentFiber.tag) {...}

  const before = getHostSibling(finishedWork)
  /*...*/
}

function getHostSibling(fiber: Fiber): ?Instance {
  let node: Fiber = fiber
  siblings: while (true) {
    while (node.sibling === null) {      if (node.return === null || isHostParent(node.return)) {        return null      }      node = node.return    }
    node.sibling.return = node.return    node = node.sibling
    while (node.tag !== HostComponent && node.tag !== HostText) {      if (node.effectTag & Placement) {        continue siblings      }      if (node.child === null) {        continue siblings      } else {        node.child.return = node        node = node.child      }    }
    if (!(node.effectTag & Placement)) {
      // Found it!
      return node.stateNode
    }
  }
}
코드를 블럭으로 나누어 의미를 따져 보자면 다음과 같습니다.
- 13 ~ 18: 부모로(
위로 ) 올라갑니다. 현재 노드의 sibling이 null이고13 부모가 호스트 컴포넌트라면14 이는 형제 탐색 경로를 모두 지나왔음을 뜻하며 참조할만한 형제가 없으므로 탐색을 중단합니다.
하지만 만약 부모가 커스텀 컴포넌트이면서 형제를 가지고 있다면 실제 DOM에 적용되었을 때는 부모의 형제가 현재 노드의 형제가 됩니다. DOM에 삽입되는 건 호스트 컴포넌트이지 커스텀 컴포넌트는 아니기 때문입니다. 이 이유로 노드의 형제가 없어도 탐색을 중단하는게 아닌 부모가 호스트 컴포넌트가 아니라면 일단 위로 올라가는 것입니다. - 20 ~ 21: 형제로(
옆으로 ) 이동합니다. - 23 ~ 33: 자식으로(
아래로 ) 이동합니다. 이동한 형제 노드가 커스텀 컴포넌트일 경우 위에서 설명드린 이유와 마찬가지로 일단 밑으로 내려가야 합니다. 이때 Placement tag가 달려있거나 자식이 없을 경우에는 해당 노드의 서브트리를 탐색할 필요가 없으므로 그다음 형제를 탐색하기 위해 siblings lable로 돌아갑니다.
위 로직을 모두 거치고 난 후 Placement tag만 달려있지 않다면 그건 우리가 찾는 형제 노드
삽입 대상 element 찾기
reconciler > ReactFiberCommitWork.js
function commitPlacement(finishedWork: Fiber): void {
  /*...*/
  // const before = getHostSibling(finishedWork);

  let node: Fiber = finishedWork;
  while (true) {
    const isHost = node.tag === HostComponent || node.tag === HostText;
    if (isHost)) {
      const stateNode = node.stateNode;
      if (before) {
        if (isContainer) {
          insertInContainerBefore(parent, stateNode, before); // parent.insertBefore(stateNode, before)
        } else {
          insertBefore(parent, stateNode, before);
        }
      } else {
        if (isContainer) {
          appendChildToContainer(parent, stateNode); // appendChild(parent, stateNode)
        } else {
          appendChild(parent, stateNode);
        }
      }
    // 호스트 컴포넌트가 아니라면 밑으로 내려간다.
    } else if (node.child !== null) {
      node.child.return = node;
      node = node.child;
      continue;
    }

    // 삽입한 노드가 finishedWork라면 작업완료를 뜻한다.
    if (node === finishedWork) {
      return;
    }
    // 형제가 없다면 위로 올라간다.
    while (node.sibling === null) {
      if (node.return === null || node.return === finishedWork) {
        return;
      }
      node = node.return;
    }
    // 형제로 이동
    node.sibling.return = node.return;
    node = node.sibling;
  }
}
finishedWork가 호스트 컴포넌트라면 해당 컴포넌트만 삽입하면 되지만 커스텀 컴포넌트일 경우 해당 컴포넌트의 자식(
Todo 예제에서 다음 하이라이트 부분을 살짝 변경 하겠습니다.
function Todo() {
  const [todos, push] = useState([]);
  const [isMounted, mountInput] = useState(false);  setTimeout(() => {    mountInput(true);  }, 3000)
  return (
    <div>      {isMounted ? <Input submit={todo => push(todos => [...todos, todo])} /> : null}      <OrderList list={todos} />
    </div>  )
}
Input 컴포넌트는 3초 뒤에 마운트될 겁니다. 이제 컴포넌트가 새롭게 추가되었으니 Commit phase에서 commitPlacement()를 통해 삽입 처리를 할 것입니다.
Commit phase가 시작되기 전 각 fiber들은 어떤 side-effect tag을 가지고 있을까요? 그리고 Effect list와 VDOM, DOM의 형태는 어떤 상태일지 추측해봅시다.
아래 이미지에서 VDOM에는 Effect tag, DOM에는 element, 마지막으로 Effect list을 채워보세요.
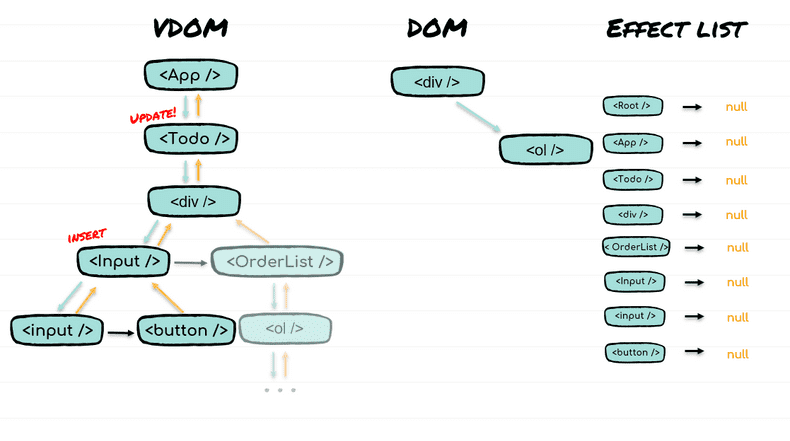
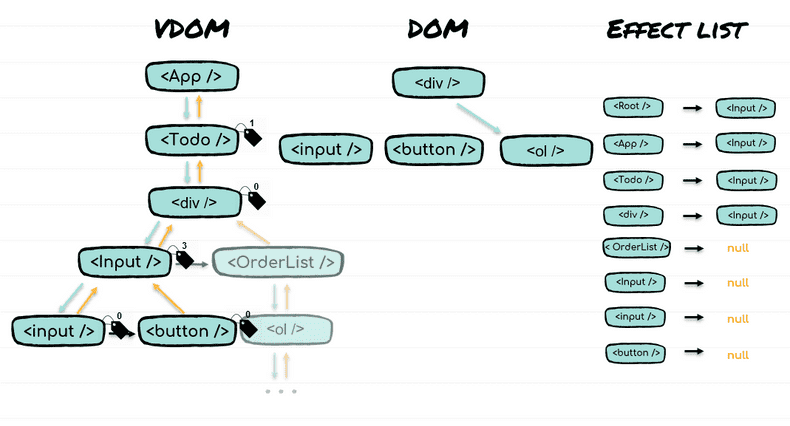
정답
-
VDOM
Todo의 상태가 변경되어 Work를 진행합니다. fiber에 새겨진 expirationTime을 통해 빠르게Todo까지 내려갑니다. 그리고 updateFunctionComponent()에서 renderWithHooks()을 통해 컴포넌트를 실행하고 PerformedWork1 tag를 달아줍니다.반환된
div를 대상으로 reconcileChildFibers()을 진행합니다. current의 type, key가 모두 같으므로 current에 props만 갈아끼워 재사용합니다. 이전div가 삭제된 것도 아니고 current도 존재하기 때문에 Effect tag는 여전히 0입니다.beginWork()에서
div의 props변경 여부를 따져 bailout path를 할지 결정합니다.div의 경우Todo가 재호출되면서 새 props를 가진 React element로 반환되었기 때문에 props 비교에서 참조값이 달라 bailout하지 못하고 div의 자식(Input과OrderList를 포함한 배열Input은 current가 없으므로 재조정 작업 중 placeChild()를 통해 Placement2 tag가 달립니다.
fiber로 확장된Input을 호출해input과button을 담고 있는 Fragment를 반환받지만 key가 없으므로 바로 벗겨내고 배열에 대한 재조정 작업을 진행합니다. 이 과정에서Input에도 PerformedWork1 tag가 달립니다. (OrderList는 설명을 생략합니다. )이때
div가 반환한 배열과Input이 반환한 배열의 처리가 placeChild()에서 조금 다르게 동작하게 됩니다. 부모가 새로 추가된 경우에는(Input ) 그 하위 서브 트리는 다른 처리할 필요 없이 그냥 마운트만 하면 됩니다. 그래서 서브 트리에 Placement tag를 달아줄 필요가 없습니다. 어차피 부모가 completeWork()에서 HTML element를 생성함과 동시에 자식들을 연결하기 때문에 부모만 DOM에 마운트된다면 자식들도 자연스레 딸려 올라갑니다. 그래서input과button에는 Placement tag가 없는 것이 이 이유때문입니다. -
Effect list
모든 노드를 대상으로 Work를 진행했으므로 leaf 노드부터 completeWork()를 통해 마무리 합니다. Effect를 위로 올려주는데 PerformedWork
1 보다 높은 tag를 가진 fiber는Input밖에 없으므로Input의 부모부터Host root까지 Effect list는Input하나만 가지고 있게 됩니다. -
DOM
Render phase를 모두 마무리 하였으니 Commit phase로 넘어가는데 Effect는
Input하나 이므로 Placement tag를 소비하기 위해 commitPlacement()을 진행합니다. 이때 DOM에는div와ol만이 존재합니다.input과button의 element는 fiber의 stateNode에 저장만 해놓은 상태입니다. 바로 지금의 상태가 위 이미지에서 DOM 트리의 형태가 되겠습니다. div 자식으로 ol만 포함되어 있고 아직input과button은 포함되어 있지 않습니다. 왜냐면 Placement tag가 달린 Effect가 아직 처리되지 않았기 때문입니다.input,button은 DOM에는 연결되어 있지 않지만 VDOM에는 연결되어 있으므로 commitPlacement()에서InputEffect를 소비하면서 1 depth에 해당하는 모든 호스트 컴포넌트 자식들을Input의 부모(div )에 추가시켜 주면서 DOM트리를 완성시킵니다.
이제 commitPlacement()에서 호스트 컴포넌트 탐색 알고리즘의 존재 이유와 새로 생성된 Input의 서브 트리에는 tag를 달지 않고 Input에만 Placement tag를 달아주는 이유를 이해하실거라 생각합니다.
2) commitWork
commitWork()는 호스트 컴포넌트의 수정사항을 DOM에 적용하거나 layoutEffect()의 clean-up 함수 호출을 담당합니다.
reconciler > ReactFiberCommitWork.js
function commitWork(current: Fiber | null, finishedWork: Fiber): void {
  switch (finishedWork.tag) {
    case FunctionComponent:
    case MemoComponent:
    case SimpleMemoComponent: {
      // Note: We currently never use MountMutation, but useLayout uses UnmountMutation.
      commitHookEffectList(UnmountMutation, MountMutation, finishedWork); // clean-up 함수 호출.      return;
    }
    case ClassComponent: {
      return;
    }
    case HostComponent: {
      const instance: Instance = finishedWork.stateNode;
      if (instance != null) {
        const newProps = finishedWork.memoizedProps;
        const updatePayload= finishedWork.updateQueue; // element의 변경점을 담고 있다.
        finishedWork.updateQueue = null;
        if (updatePayload !== null) {
          commitUpdate(instance, updatePayload, newProps);        }
      }
      return;
    }
    case HostText: {
      const textInstance: TextInstance = finishedWork.stateNode;
      const newText: string = finishedWork.memoizedProps;
      commitTextUpdate(textInstance, newText); // textInstance.nodeValue = newText;
      return;
    }
    /*...*/
    default: {
      invariant(
        false,
        'This unit of work tag should not have side-effects. This error is ' +
          'likely caused by a bug in React. Please file an issue.',
      );
    }
  }
}
useLayoutEffect()는 useEffect()와는 다르게 DOM 변경 전과 후에 각각 실행되므로 clean-up 함수를 호출할 시점은 지금
UnmountMutation tag는 useLayoutEffect() 구현체에서 달아줍니다.
reconciler > client > ReactDOMHostConfig.js
function commitUpdate(
  domElement: Instance,
  updatePayload: Array<mixed>,
  newProps: Props,
): void {
  updateFiberProps(domElement, newProps);
  updateProperties(domElement, updatePayload, newProps);
}-
updateFiberProps()는 호스트 환경에서 리액트에 접근하기 위해 HTML element에 뚫어 놓았던 props 저장 공간을 새로운 props로 덮어주는 역할을 합니다.reconciler > client > ReactDOMComponentTree.js
const internalEventHandlersKey = '__reactEventHandlers$' + randomKey; function updateFiberProps(node, props) { node[internalEventHandlersKey] = props; } -
updateProperties()는 변경점을 DOM 노드에 적용하는 함수입니다.reconciler > client > ReactDOMComponent.js
function updateProperties(domElement: Element, updatePayload: Array<any>): void {
  // Apply the diff.
  updateDOMProperties(domElement, updatePayload);
}

function updateDOMProperties(domElement: Element, updatePayload: Array<any>): void {
  for (let i = 0; i < updatePayload.length; i += 2) {
    const propKey = updatePayload[i];
    const propValue = updatePayload[i + 1];
    if (propKey === STYLE) {
      setValueForStyles(domElement, propValue);    } else if (propKey === DANGEROUSLY_SET_INNER_HTML) {
      setInnerHTML(domElement, propValue);    } else if (propKey === CHILDREN) {
      setTextContent(domElement, propValue);    } else {
      setValueForProperty(domElement, propKey, propValue);    }
  }
하이라이트 부분은 호스트 기능과 연관된 함수들로 다음의 링크들로 설명을 대체합니다.
3) commitDeletion
컴포넌트를 삭제합니다.
reconciler > ReactFiberCommitWork.js
function commitDeletion(
finishedRoot: FiberRoot,
current: Fiber,
renderPriorityLevel: ReactPriorityLevel,
): void {
  unmountHostComponents(finishedRoot, current, renderPriorityLevel);
  detachFiber(current);
}unmountHostComponents()는 삭제와 삭제 대상의 서브 트리에 위치한 컴포넌트들의 언마운트 처리를 합니다.detachFiber()는 GC를 위한 fiber 초기화 처리를 합니다.
비교적 간단한 detachFiber() 부터 확인하겠습니다.
detachFiber()
reconciler > ReactFiberCommitWork.js
function detachFiber(current: Fiber) {
  const alternate = current.alternate;
  current.return = null;
  current.child = null;
  current.memoizedState = null;
  current.updateQueue = null;
  current.dependencies = null;
  current.alternate = null;
  current.firstEffect = null;
  current.lastEffect = null;
  current.pendingProps = null;
  current.memoizedProps = null;
  if (alternate !== null) {
    detachFiber(alternate);
  }
}
GC를 위해 fiber의 포인터을 초기화합니다. 해당 컴포넌트는 삭제 대상의 최상단 노드에 해당합니다. 해당 노드가 삭제 대상이라면 서브 트리의 컴포넌트 또한 삭제되어야 합니다. 이 때문에 서브 트리의 fiber도 초기화 해야 된다고 생각할 수 있지만 단순히 최상단 노드가 가리키는 포인터만 초기화 하여도 삭제 해야될 트리를 VDOM에서 떼어 놓는 것이 되므로 모든 노드 들이 알아서 GC 대상이 될 것입니다.
unmountHostComponents()
컴포넌트를 삭제할 때 유의해야 될 점은 삽입과 마찬가지로 삽입 대상이 호스트 컴포넌트가 아니라면 해당 컴포넌트의 자식들 중 DOM 기준으로 자식에 해당하는 호스트 컴포넌트를 모두 찾아 삭제해주어야 한다는 점입니다.
reconciler > ReactFiberCommitWork.js
function unmountHostComponents(
  finishedRoot,
  current,
  renderPriorityLevel,
): void {
  let node: Fiber = current;

  let currentParentIsValid = false; // 부모를 찾았는지 알려주는 flag
  let currentParent;
  let currentParentIsContainer;

  while (true) {
    // 부모를 찾는다
    if (!currentParentIsValid) {
      let parent = node.return;
      findParent: while (true) {
        invariant(
          parent !== null,
          'Expected to find a host parent. This error is likely caused by ' +
            'a bug in React. Please file an issue.',
        );
        const parentStateNode = parent.stateNode;
        //  부모 HTML element 추출
        switch (parent.tag) {
          case HostComponent:
            currentParent = parentStateNode;
            currentParentIsContainer = false;
            break findParent;
          case HostRoot:
            currentParent = parentStateNode.containerInfo;
            currentParentIsContainer = true;
            break findParent;
            /*...*/
        }
        parent = parent.return;
      }
      currentParentIsValid = true;
    }

    // 부모에서 호스트 컴포넌트 삭제
    if (node.tag === HostComponent || node.tag === HostText) {
      if (currentParentIsContainer) {
        removeChildFromContainer(currentParent, node.stateNode); // currentParent.removeChild(node.stateNode);
      } else {
        removeChild(currentParent, node.stateNode); // currentParent.removeChild(node.stateNode);
      }
    } else {
      // 컴포넌트 언마운트 처리
      commitUnmount(finishedRoot, node, renderPriorityLevel);
      // 호스트 컴포넌트를 찾기 위해 밑으로 내려간다.
      if (node.child !== null) {
        node.child.return = node;
        node = node.child;
        continue;
      }
    }

    if (node === current) {
      return;
    }
    // 내려온 만큼 위로 올라간다.
    while (node.sibling === null) {
      if (node.return === null || node.return === current) {
        return;
      }
      node = node.return;
    }
    // 옆으로 이동
    node.sibling.return = node.return;
    node = node.sibling;
  }
}- 먼저 삭제 대상의 부모를 찾는다
15 ~ 39 . 부모를 찾았다면 로직의 중복 실행을 방지하기 위해currentParentIsValid를 설정28, 32 합니다. - 삭제 대상이 호스트 컴포넌트라면
42 DOM에서 삭제44, 46 하고 끝냅니다60 . - 삭제 대상이 호스트 컴포넌트가 아니라면 해당 컴포넌트를 언마운트 처리
50 하고 1 depth에 해당하는 호스트 컴포넌트를 찾아 아래로 내려54 갑니다.
나머지 트리 순회 코드의 경우 많이 언급하였으므로 설명을 생략하겠습니다.
commitUnmount()
컴포넌트를 삭제하기 위해 언마운트 처리를 합니다. 함수형 컴포넌트의 경우 라이프 사이클 Effect의 destroy(
reconciler > ReactFiberCommitWork.js
function commitUnmount(
  finishedRoot: FiberRoot,
  current: Fiber,
  renderPriorityLevel: ReactPriorityLevel,
): void {
  switch (current.tag) {
    case FunctionComponent:
    case ForwardRef:
    case MemoComponent:
    case SimpleMemoComponent: {
      const updateQueue = current.updateQueue;
      if (updateQueue !== null) {
        const lastEffect = updateQueue.lastEffect;
        if (lastEffect !== null) {
          const firstEffect = lastEffect.next;

          const priorityLevel =
            renderPriorityLevel > NormalPriority
              ? NormalPriority
              : renderPriorityLevel;
          runWithPriority(priorityLevel, () => {
            let effect = firstEffect;
            do {
              const destroy = effect.destroy;
              if (destroy !== undefined) {
                safelyCallDestroy(current, destroy); // destroy();              }
              effect = effect.next;
            } while (effect !== firstEffect);
          });
        }
      }
      break;
    }
    case ClassComponent: {
      const instance = current.stateNode;
      if (typeof instance.componentWillUnmount === 'function') {
        safelyCallComponentWillUnmount(current, instance); // instance.componentWillUnmount();      }
      return;
    }
  }
}
7 - 4 commitLayoutEffects
commitLayoutEffects()가 호출된 시점은 VDOM이 DOM에 모두 적용된 상태이며 커스텀 컴포넌트라면 라이프 사이클, 호스트 컴포넌트라면 auto focus 처리를 해주어야 합니다.
reconciler > ReactFiberWorkLoop.js
function commitLayoutEffects(root, committedExpirationTime) {
  while (nextEffect !== null) {
    const effectTag = nextEffect.effectTag;
    if (effectTag & (Update | Callback)) {      const current = nextEffect.alternate;
      commitLifeCycles(root, current, nextEffect, committedExpirationTime);
    }
    nextEffect = nextEffect.nextEffect;
  }
}
Update tag는 useEffect()와 useLayoutEffect()에서 달아줍니다.
reconciler > ReactFiberCommitWork.js
function commitLifeCycles(finishedRoot, current, finishedWork, committedExpirationTime) {
  switch (finishedWork.tag) {
    case FunctionComponent:
    case ForwardRef:
    case SimpleMemoComponent: {
      commitHookEffectList(UnmountLayout, MountLayout, finishedWork); // layoutEffect      break;
    }
    case ClassComponent: {
      const instance = finishedWork.stateNode;
      if (finishedWork.effectTag & Update) {
        if (current === null) {
          instance.componentDidMount();        } else {
          const prevProps = finishedWork.elementType === finishedWork.type
              ? current.memoizedProps
              : resolveDefaultProps(finishedWork.type, current.memoizedProps); // defaultProps 적용
          const prevState = current.memoizedState;
          instance.componentDidUpdate(            prevProps,
            prevState,
            instance.__reactInternalSnapshotBeforeUpdate // commitBeforeMutationEffectOnFiber에서 찍어놨던 스냅샷
          );
        }
      }
      return;
    }
    case HostComponent: {
      const instance: Instance = finishedWork.stateNode;
      if (current === null && finishedWork.effectTag & Update) {
        const type = finishedWork.type;
        const props = finishedWork.memoizedProps;
        commitMount(instance, type, props, finishedWork); // auto-focus      }
      return;
    }
     /*...*/
    default: {
      invariant(
        false,
        'This unit of work tag should not have side-effects. This error is ' +
          'likely caused by a bug in React. Please file an issue.',
      );
    }
  }
}
MountLayout tag
7 는 useLayoutEffect() 구현체에서 달아줍니다.
- 클래스 컴포넌트
10 는 마운트, 업데이트 여부13 에 따라 각각componentDidMount()14 ,componentDidUpdate()20 를 호출합니다. - 함수형 컴포넌트
4 의 경우 해당 시점에 처리해야할 작업은 layout effect 입니다. -
호스트 컴포넌트
29 는 auto focus를 지원해주어야 하는 element일 경우 처리34 합니다.react-dom > client > ReactDOMHostConfig.js
function commitMount(domElement, type, newProps) {
    if (shouldAutoFocusHostComponent(type, newProps)) {
      domElement.focus();
    }
}
Commit phase는 여기서 끝입니다. commitRoot()의 전체 로직을 확인해보세요. 이제는 어렵지 않게 이해하실 수 있지 않을까 기대해봅니다.
❗ useEffect()와 useLayoutEffect()의 활용법
useEffect()와 useLayoutEffect()의 활용도는 실행 시점의 차이에서 옵니다.
useEffect()를 사용하여 ui와 관련된 작업할 경우, 예를 들면 특정 element를 렌더링 한 후, 각 element의 위치나 크기에 따라서 추가적인 효과를 주었을 때 사용자는 깜빡임 또는 부자연스러운 효과를 눈으로 확인하게 됩니다. 이때 useLayoutEffect()를 사용하면 이 문제점을 해결할 수 있습니다.
useLayoutEffect()의 실행 시점에서는 element가 DOM에 마운트된 상황이므로 참조하여 위치나 크기를 얻어올 수 있지만 아직까지는 call stack를 비워주지 않았으므로 브라우저는 렌더링 작업을 진행하지 못한 상태입니다. 이때 추가적인 ui 작업을 함으로서 브라우저는 마지막 작업물을 기준으로 렌더링하게 만드는 것입니다.
useLayoutEffect()를 사용할 때 조심해야할 부분은 무거운 작업을 useLayoutEffect()에서 진행하게 된다면 브라우저의 렌더링을 블록킹하게 되는 불상사가 일어나므로 신중히 사용하길 권장하고 있습니다.
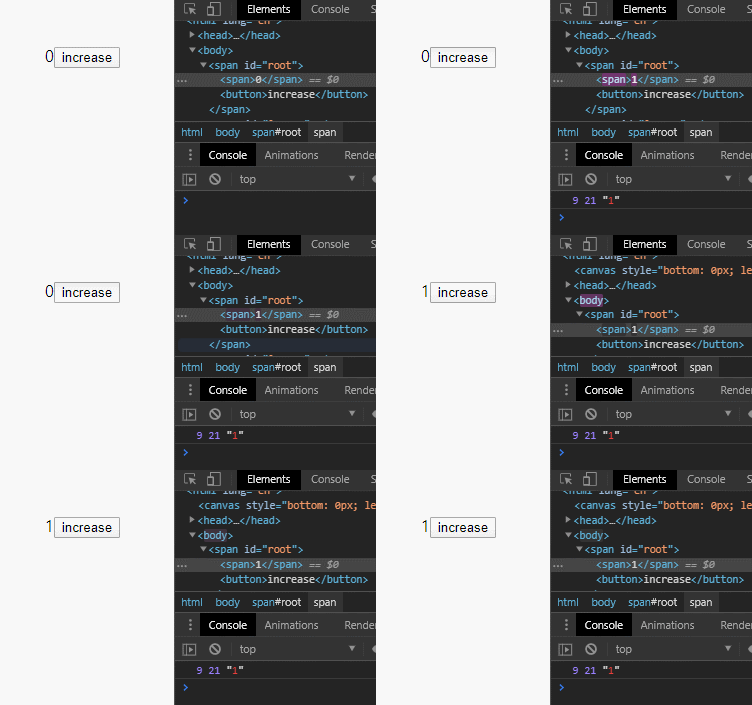
다음 예제에서 useLayoutEffect()을 이용하여 화면이 렌더링되기 전에 element를 참조하여 정보를 가지고 올 수 있는지, 렌더링을 블록킹하는지 확인해봅시다.
const Foo = () => {
  const [count, increase] = useState(0);
  const counterRef = useRef();
  useLayoutEffect(() => {
    const {offsetWidth, offsetHeight, firstChild: { nodeValue }} = counterRef.current;
    console.log(offsetWidth, offsetHeight, nodeValue);
    for(let i = 0; i <= 1e8; i++) {Math.random()};
  })
  return <><span ref={counterRef}>{count}</span><button onClick={() => increase(count + 1)}>increase</button></>
}
마무리
다음 포스트는 Synthetic Event에 대한 글을 작성할 예정이었습니다. 하지만 다음 메이저 버전인 v17에서 이벤트 시스템 구현이 변경됩니다. 그러므로 해당 포스트는 추후 여유가 될 때 변경된 코드를 기준으로 작성하도록 하겠습니다.
더불어 reconciler 또한 github를 방문해 보시면 업데이트를 진행하고 있다는걸 알 수 있습니다. 하지만 큰 틀은 변경되지 않을 것으로 보이며 큰 걱정없이 지금까지 이해하셨던 설계 모델를 그대로 이해하고 계시면 될 것 같습니다.
여기까지 잘 이해하시면서 넘어오셨을지가 궁금하네요. 아마도 그렇지 않은 분들이 대부분이지 않을까 생각합니다. 개인적으로 리액트를 분석하면서 이해한 것들을 100% 전달해드리지 못했다는 느낌이 들지만 한편으로는 빠져있는 이 부분들은 여러분들이 직접 코드를 분석해가며 채워나가야 할 부분들이라 생각해봅니다.
긴 글 끝까지 읽어주셔서 감사드립니다.
